The quest to get a good Christmas Card Photo

Since this Christmas is all about saving money, I have taken it upon myself to try and he a good Christmas card photo. I have a great idea in mind for the finished product, but getting there is proving to be a real problem! Our Christmas at last year was a real hit, but we did have a professional photographer take the picture and then photoshop us into a snow globe!

20131221-114945.jpg

The first attempt with the girls resulted in Hadley being happy and Tylyn being… Let’s just say difficult. Here are some of the “good” shots:

20131221-115122.jpg

20131221-115156.jpg

20131221-115220.jpg

20131221-115242.jpg

The next day at the mall, we had a few impromptu opportunities to take some pictures while waiting in line for Santa.

20131221-115401.jpg

20131221-115412.jpg

20131221-115426.jpg

20131221-115448.jpg
And yet again, no bueno. If you are wondering ‘where is the Santa photo’ let me just stop you right there. I was not about to spend $22! on a lousy photo with a creepy mall Santa. I can only imagine what the one shot mug would have produced. Instead we opted for the free visit and candy cane. Tylyn was so adamant about sitting on Santa’s lap but once she got there the cat clearly had her tongue!

This morning was take 2 of the home photo shoot, and surprisingly with the opposite results. Tylyn was being darling and Hadley had enough. Some of the better photos:

20131221-115853.jpg

20131221-115909.jpg

20131221-115924.jpg

20131221-115940.jpg

20131221-120002.jpg

20131221-120022.jpg

20131221-120037.jpg

20131221-120059.jpg

20131221-120117.jpg

I think it’s time to face reality. These are the best I’m gonna get! All I have to do now is photoshop the heck out of them 😉

But seriously, I have CUTE kids!!

High Low Challenge

One of my favorite ways to design is by giving myself my own little “High-Low Challenges”. Meaning, I look for a high end design that I L❤VE and I try to recreate it on a limited budget. Because, just like everyone else, I want a high end look without breaking the bank.

My “High-End” Design Inspiration:

20131207-200647.jpg
These White Chippendale style dining chairs from http://www.homedecoratorscollection.com are currently on sale for $161 each!

Let’s face it, I don’t have $600+ for dining chairs!

But a little scouring of the ole’ Craigslist ads and I found these beauties:

20131207-201027.jpg
4 Chippendale style chairs! And for a grand total of $25! Can you say “STEAL”! Time to give these gals a face lift:

Step 1: Prep
I always use a foam sanding block to rough up the surface of the wood so the paint will stick. Then I paint a base coat with a primer sealer. This was necessary because I was painting a dark stain with white paint. It ultimately saved me an extra coat.

Step 2: Paint
I always use a foam roller and foam brushes. They are cheap and the paint sticks to the wood easier than with a bristol brush. Make sure to catch all drips… while painting furniture you are bound to have a lot of them!

20131207-201716.jpg

Step 3: Upholstery
I found a beautiful and simple tan linen upholstery. After detaching the seats I simply used a staple gun, making sure to pull the fabric taut. Here are some example photos for newbies:

20131207-202606.jpg

20131207-202637.jpg

20131207-202701.jpg

20131207-202741.jpg

Step 4: Admire

20131207-203008.jpg

Luckily, I finished these chairs just in time for Thanksgiving. We expanded our table and added to our previous DIY Silver X-back chairs with our new Chippendale chairs for a table set for 8! I love mixing vintage inspired items with classical pieces and modern aesthetics.

20131207-203340.jpg

With the chairs in place I began to set our Thanksgiving table. The stage was laid with some burlap fabric I had in storage, and then metallic $1chargers allowed me to mimic the metallic on my x-Back chairs. I mixed gold a silver so that neither metallic would dominate the setting. I pulled out our wedding china for the first time, pleased to find how perfectly it went with my new Chippendale chairs. I elongated the centerpiece down the table’s aisle complete with white candles, a hammered silver votive, pine cones, and a gold/silver metallic owl (found for $7). I found a spool of twine in the garage and tied it around the center of each napkin, giving a bowtie shape. The table was set. The result was simply stunning.

20131207-204159.jpg

20131207-204220.jpg

20131207-204305.jpg

20131207-204329.jpg

High-Low Challenge Success!

20131207-204840.jpg
High- $600+. Low- $35

Wink Ink Baby Books

Hello Blog Friends!

I have a very exciting project to tell you about! Over the past 5 months, I have been working during every free moment (they are hard to come by you know) on my special baby – BABY BOOKS! I know how crazy this may sound…. “Lexie has started a business making baby book…” But trust me, this is the REAL DEAL!

The first step was IDEA: It came to me during the middle of the night while contemplating a.)ways to make money and b.)things that people really need. And of course having my 2 babies asleep in their beds added to the inspiration. I started to think about the way we share photo’s – all via social media, Facebook, Instagram, Pinterest. And I thought, how will my daughters look at their baby pictures when they grow up? Will they sign onto Facebook and look far back in my photo album history until they find them? Will these platforms one day become “a thing of the past?” The second thought I had was, “With all of the stimuli of amazing, creative, do-it-all, crafty images we see on Pinterest, How can ANYONE measure up?” Let’s face it… being a mom is hard work. You barely have time to take a shower so how on earth are you supposed to have time to scrapbook, do craft projects, decorate for ALL the holidays, document every moment, and do it all with a smile on your face? Well truly it is impossible. We can do parts and pieces of it all. But we can not to all of it.

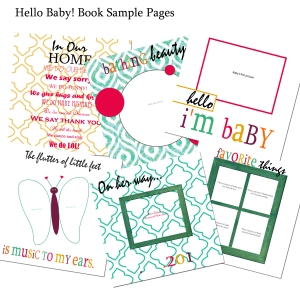
That is where the idea came from. I wanted to create a “memory book” that captured all of the best moments of baby’s first year of life, and have a physical, living document of it that can be shared, admired and kept for years to come! What else should this memory book be…? It should be modern! It should be trendy! It should have all of those crafty projects you saw on Pinterest right there at your finger tips! No trips to the craft store required.

So I compiled all of my favorite ideas, into one place, made sleek modern designs inspired by current trends and patterns and came up with 10 different Baby Book Themes (Because you don’t want to have the same one as your neighbor).

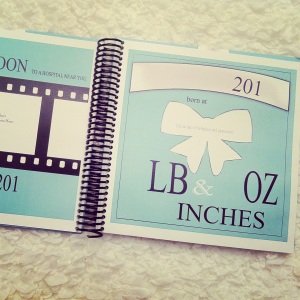
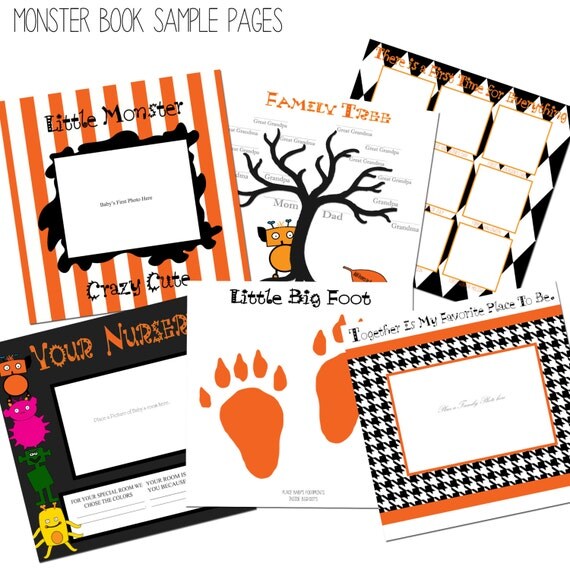
The next step was to begin producing a prototype. It took several tries, to come up with the ideal solution to the typical scrapbook. You know those pesky plastic sleeves, the ones where the pages always slide out, pictures fall out and your scrapbook becomes… well just SCRAPS. Those plastic sleeves were a no-go from the beginning, which lead us to an incredible solution. Each page is it’s own cut out frame. You can easily slide your picture in from the top and secure it in place with no more than a dot of glue. In one easy step your pictures are framed inside a perfect keepsake book!

photo


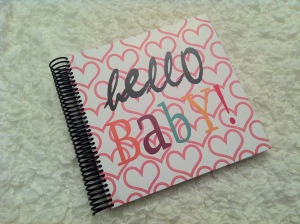
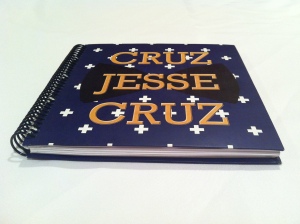
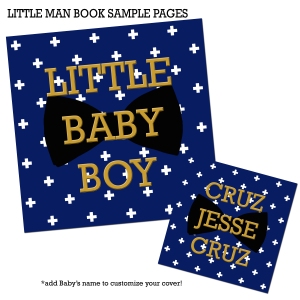
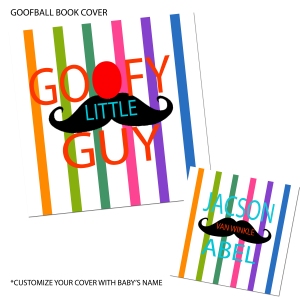
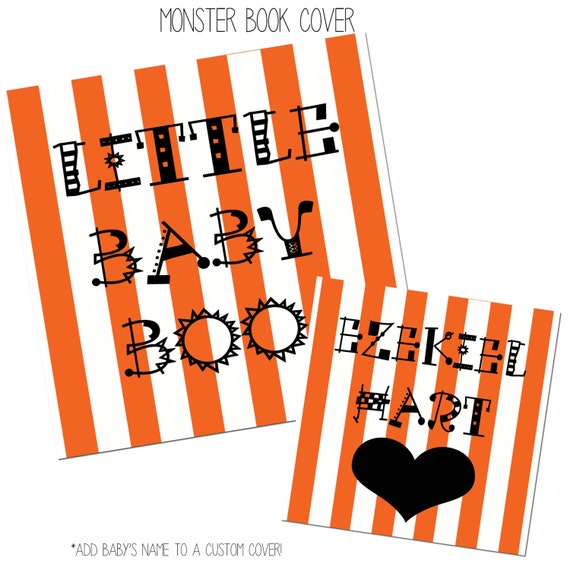
Then there was the cover to figure out. I knew I wanted to avoid the fabric wrapped scrapbook binders and do something different. So we figured out a way to make hard covers that will be spiral bound along with the pages. The covers can be customized with your baby’s name as well!

photo (2) TIFFANY SAMPLE PAGE COVER


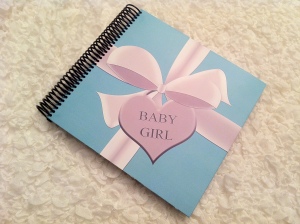
Nothing “babyish” about this Baby Book!

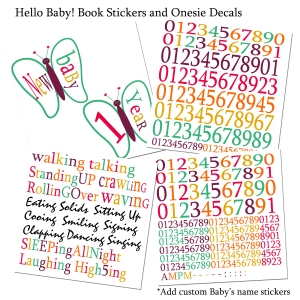
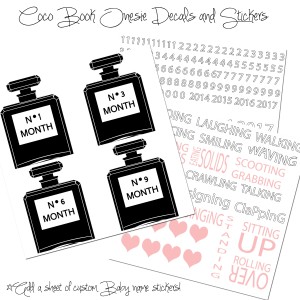
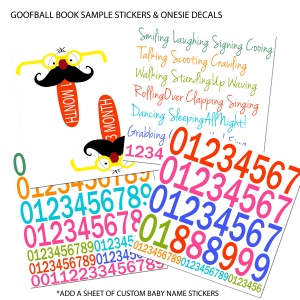
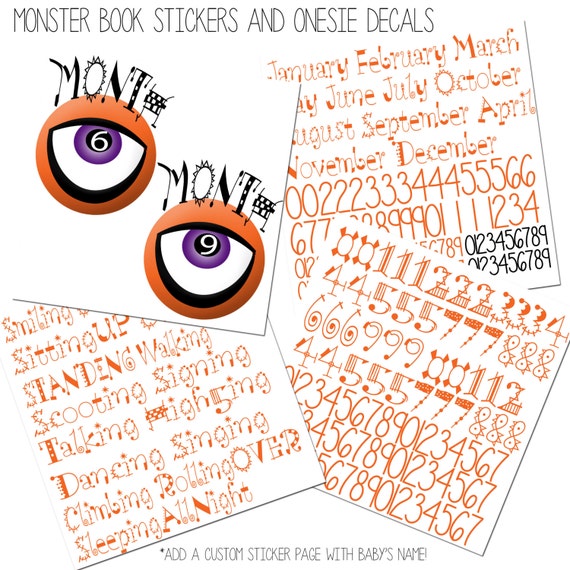
Lastly, I wanted each page of the book to be “frame worthy”. This meant that when it comes to filling out the book, instead of using a pen to fill it in, it could be filled in with custom stickers that matched the font of each book.

photo (1) TIFFANY SAMPLE PAGE STICKERS

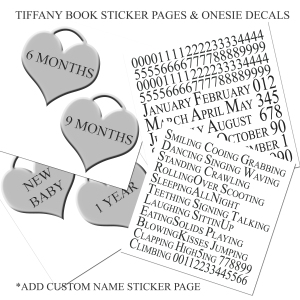
Also included are onesie decals to take milestone photo’s of your baby, and include in the book of course!

TIFFANY BOOK SAMPLE PAGES


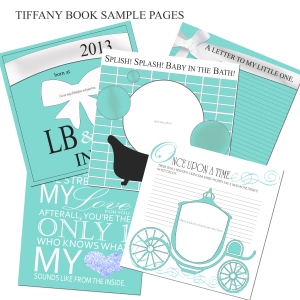
More inside pages from the Tiffany Book

And now we are FINALLY selling our baby books! Check out our store at https://www.etsy.com/shop/winkinkbooks

These are a great gift for Baby showers and Christmas presents this holiday season!

Other Designs currently for sale:

Hello BABY! Book

photo (3)hello sample page 1 hello sample page 2 hello sample 3

Little Man Book

photo (4)little man sample page covers little man sample pages little man sample page stickers


Coco Chanel Book

coco book images 2coco book images 1  coco book images 3


Goofball Book

goofball sample pages 1 goofball sample pages 2 goofball sample pages 3


Monster Book

Custom Cover - Monster, Black and Orange Baby BookModern Monster Black and Orange Baby Memory and Keepsake Book


Glamorous things From the Fall

It has almost been a year since I began this blog, with aspirations to post daily. My goal fell short, and my posts have trickled off since I had my second baby! But a lot has happened since I last wrote so I have LOTS to share!

My daily desire to be glamorous is still a struggle but I have indeed managed to be glamorous on occasion. Here is a glimpse of a few occasions.

Halloween:

20131205-060434.jpg

20131205-060542.jpg
We took our babies to the pumpkin patch to ramp up our holiday fun and Van Winkle Family Field Trips! It was a success and a beautiful day for October in the Pacific Northwest!

20131205-060957.jpg
Then came time to decorate the pumpkins. I’m not a fan of carving so I tend to opt for paint or other fun pumpkin projects! This year all it called for was a bit of Elmer’s glue and some sparkle! It was exactly like the art projects I did in 1st Grade: paint polka dots with glue, pour on glitter, shake off onto newspaper and VOILA!

20131205-061308.jpg

Last years pumpkins were actually much more involved so I was very happy with the simplicity.

20131205-061439.jpg
Last years silhouette pumpkins.

Once we had completed our pumpkins it was time to figure out costumes! I dropped the ball last year and didn’t have a costume for Tylyn’s First Halloween. So I had to make up for it this year. I found some pink chevron leggings and an owl hat on Zulily which prompted me to complete her Owl costume.

20131205-062118.jpg
All I made was a onesie with felt feathers. It cost maybe $3, as I used an old long sleeve onesie that she was about to outgrow. I cut feather shapes out of the felt, attached them with hot glue and lastly made 2 felt wings to glue onto the back.

20131205-062418.jpg
About an hour before going trick or treating I showed Tylyn what it was all about with a practice run. Once she learned it was all about candy she was ready to roll! She would have trick-or-treated all night, if I would have let her.

Now for Hadley’s costume… I found an inspiation picture from Pinterest of a candy corn costume that I loved and aspired to make it myself. When I showed the woman at the fabric store she crushed my dreams by telling me it was crocheted. I can’t do that!

20131205-063001.jpg
Luckily I didn’t give up hope and found some fuzzy fabric very similar. The only problem was it only came in white! Again, I didn’t let a little thing like color stop me so I bought some dye to change the color myself! I even managed to contain the mess!

The next step was to sew it together. I’m a beginner at best and still need my moms help to thread the machine. I made my own pattern and got to work! It went smoothly and without a “snag” (pardon my pun), and my results were pretty awesome!

20131205-063552.jpg

20131205-063639.jpg

20131205-063657.jpg
The one mistake I did make, and realized when I saw an actual candy corn, was that the yellow and orange blocks should have been switched (yellow on the bottom and orange in the middle). No big thing.

My kids are so cute that I just have to leave you with a couple more images.

20131205-070251.jpg

20131205-070347.jpg

20131205-070451.jpg

20131205-070529.jpg